Getting Started with Dataverse Plugins – Part 2
- Apr 19
- 8 min read
In the first instalment of ‘Getting Started with Dataverse Plugins’, we covered the software needed to create, develop and register plugins within Dataverse. In this instalment, we’re going to look at
Structuring plugins,
Adding in some new terminology (assembly and step),
Creating our first plugin,
Where AI can help, if you’re not familiar with C#.
If you haven’t already read the first part of this series, it’s probably best to start there, just to ensure you have everything you need on your device:
Plugin Projects Location
The first thing we’ll do, is set up a location to develop our plugins. In this case, we’re just setting up a simple location to work with the tools we have. In real world 'work' scenarios, we would usually expect tools like GitHub or Azure DevOps to play a part in how we store, manage, evolve and version our projects. However, we’ll keep things simple here, and I’ll talk more around tooling for development on this site in future.
Decide on a location on your device to create a plugin project folder, where you will store all the plugins you develop. In my case, I created a folder directly under the C drive, making it easy to find and work with. Once you’ve selected an appropriate location, create a folder called ‘Projects’, you can call this whatever you like, but again, I just want to keep things simple here.

The Project Folder for Your Plugin
Within the folder we have created above, create another folder, this will be the project folder for the specific development/plugin you're building. Before you create it, let’s dive briefly into the topic of scope – how big is the app/solution you’re applying plugins to? If your app, or series of apps, make up quite a large solution, with tens or even hundreds of Dataverse tables, then it’s not a good idea to create one plugin / assembly for all of it (You'll start to see the word 'assembly' used with or instead of plugin, this will become clearer later), this is likely to become hard to manage and you'll find yourself wasting a significant amount of time trying to find items within it. As we get further into this build and start creating steps and images against our assembly, you'll begin to see why a large assembly could be hard to work with. Also, something to be aware of is, as of now, a single assembly has a 16mb limit, so it’s possible you could hit that limit and then have to start the painful process of breaking up your project to create smaller sized ones. Equally, you don’t want to go so granular that you’re managing forty seperate plugin projects for a solution with fifty tables. If your app is just a small one and will stay that way, then you don’t have this worry, a sinlge plugin is probably fine. If your app is above ten tables, and there are plans for it to grow further, then think about splitting projects up to fit specific groups or functions within the app. For example, if this is a large facilities management app, you could have one project for room booking plugins, one for desk booking, one for repairs and maybe a final one for any shared parts that multiple elements of the solution refer to, such as a cost code table.
For this scenario, don’t create all of the project folders you think you'll need at once, pick one area to focus on and create a folder for that project. In our example above, we might create one called ‘Facilities.Plugin.Rooms’ to cover the desk booking side of the app. In my case I’ve just created a folder for the project called ‘Self Development Tracker’.

Generate the Project File Structure
With your project folder created, it’s now time to add the plugin file structure within it. Open Command Prompt and navigate into your project folder. If you’re not familiar with navigating around your file structure using Command Prompt, stick with the command ‘cd’ to move up and down your filing structure for now. Use ‘cd..’ and click ‘Enter’ to move back/up a level and then if you type ‘cd’, add a space, type the first few letters of the folder you want to navigate into and click tab (click tab a few times to work through a few options that all start with the same letter) and click 'Enter' you will navigate into that folder.

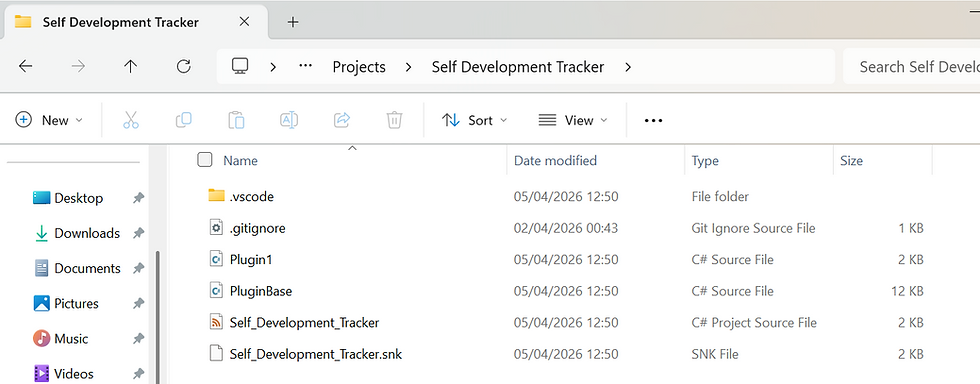
Once inside your project folder, in my case ' Self Development Tracker' enter the following command into Command Prompt and click ‘Enter’ – ‘pac plugin init’.

Running this command will then automatically generate the required structure of files and folders needed for your plugin project. If you then open up the project folder, you will see the generated structure.
Opening the Project and Adding Code
Now we can open up our newly created project and start crafting the steps for our plugin project. Think of steps as the individual functions you want the plugin to do, such as validation of a certain field or updating another record based on a record that's been created. Think of the assembly as the collection of steps related to a specific area of a large solution or all the steps for a small solution. Open Visual Studio Code, select ‘File’ and then ‘Open Folder…’.Navigate to your plugin projects folder, highlight your plugin project folder and click ‘Select folder’. You will then see your project appear in the explorer panel in Visual Studio Code.

The file we’re really interested in here is ‘Plugin1.cs’, this is our starting point. In Plugin1.cs we’re going to drop in our C# code, but first we need to write it. If you don’t know how to write C#, only know the basics or even know it to a reasonable extent, but not for Dataverse plugins, then don’t worry, as we won’t need to write a line of code ourselves. Of late, I've become a huge fan of AI, and writing code is where AI absolutely shines, especially for Power Platform projects, such as this. AI is even great at debugging, should the code produced not work first time. The best bit is, it’s fast, insanely fast. In this world of AI, I’m able to get the requirements for a plugin, set out a good AI request and have it in the system within the hour. If your organisation is one of those that's tracking the value of AI, this one is a great use case to highlight, as here AI is enabling us to do things we may not have been able to do in the first place and doing it rapidly!
Anyway, back to writing the code. To get AI to write our code, we need to make sure we give it all the information it needs. It really is worth that upfront time to get the request right, as this then means it's more likely to produce working code first time and save us going backwards and forwards debugging it. First of all, get the fields/columns from Dataverse that the plugin will be working with. Make sure you get both the friendly name of the field, as well as its logical name. The logical name of a column can be found under the advanced section of the column settings and should be the column's name, with the publisher prefix, all lower case and no spaces. In my case, I want two fields, which are ‘Start Date’ / ‘sj_startdate’ and ‘Target End Date’ / ‘sj_targetenddate’. Other things you should provide:
The type of fields being referenced. Give it everything, not just the basics like ‘Date and Time’, but things like if it is 'Date Only'.
If you are referencing a choice field, outline the choices, if they are part of the solution. Reference both the label and the value of each choice.
If you’re working with lookup fields, give the name and logical name of the table it is referencing.
Once you’ve got all the information together, be very clear what you want the code to do. An example of my request to AI would be:
“Build me a step for a Dataverse plugin. The step should run when a record is created and updated. The step should check the value of the date only field called ‘Start Date’ (logical name: ‘sj_startdate’), is not after the value of the date only field called ‘Target End Date’ (sj_targetenddate). If the Target End Date is before the start date, then prevent the record from being saved and highlight to the user, with a friendly and helpful message, what the issue is. Do you have everything you need or do you require more information?"
It could be that you don’t just want to trust what AI spits out and instead you may wish to understand more about what it has written. In that case, ask it to explain the code. It will sometimes do this anyway. You may also notice that AI gives you additional instructions on how to deploy your plugin, that’s fine and they will likely come in useful later, as we go through the steps of loading our plugin into Dataverse.
Another thing you could also add to the request, is for it to suggest a name for the file you’ll be adding the code into, if you don’t already have a convention in mind.
With regards to which AI you use, that is entirely up to you. I’ve used Microsoft Copilot, ChatGPT and Claude quite a bit in recent months. For Dataverse plugins, I’ve found Claude to be brilliant, especially when it comes to debugging.
With the code produced, take a copy of what AI has generated and then go back Visual Studio Code. Delete everything out of the Plugin1.cs file and paste in what AI has given you. Save this and then rename the Plugin1.cs file to either the name AI has suggested or one you want to use.

Summary
So, in this instalment we’ve:
Set up a project location for our plugin developments,
Created a folder for our first plugin (and decided on the scope of the plugin),
Generated the file and folder structure for our plugin,
Used AI to generate code for our plugin and loaded this into our project in Visual Studio Code.
Next blog
I think that's enough for this blog. The next blog will be centred around getting our plugin into Dataverse. There are quite a few parts of this process to explain. Things like ‘assembly’ and ‘step’ will also become clearer, as we configure them in Dataverse. We’ll discuss something called the pipeline, as well as other useful tools in the plugin development process, such as pre-images and attribute filtering. It’s where you start to see the real power of plugins and realise how flexible they can be.


Comments